 |
 |
|---|
 |
|---|
 |
|---|
|
|
|
|---|
 | Zingoolarity Homepage | | TOPICS | | Using the Roadmap view |
| Using the Roadmap view |
|---|
Using the Roadmap viewThe Roadmap view mode is a little bit different compared to the other two view modes and needs a little bit more preparation to produce meaningful results. First of all, you have to create a topic which represents the roadmap itself.
From the "Timeline” drop-down box of the "Subtopics Timeline” select the starting period. Next, select a "Span” of 12 units, as our roadmap initially will cover 12 months. Now click the "Save” button and have a look at the "Subtopics Timeline” section again. Now click the "Save+Back” button to return to the previous screen and focus on the newly created roadmap topic (and make sure that you switch to the "Roadmap” view mode):
Just below the breadcrumb, you will see the roadmap banner. When you scroll to the right, you will notice a couple of empty unlabled slots.
Now we add our first topic by clicking the "Add” button in the breadcrumb.
This already looks familiar; much like the other view modes in Zingoolarity. Now we add 4 more topics:
You will immediately notice, that the topics are ordered alphabetically by default, as we have not yet provided any additional information. Now we edit the "Topic 1” and locate the "Topic Timing” section.
In the "Timing” field we select "January 2024” and in the "Duration” field we select "2 units”.
The "Topic 1” has moved to the bottom of the list, is now placed in the "January 2024” column and spans over two columns, also covering "February 2024”. This already looks a little bit more like a roadmap already. After having edited the remaining 4 example topics, the picture will look like this:
Now things are already assembled on a timeline.
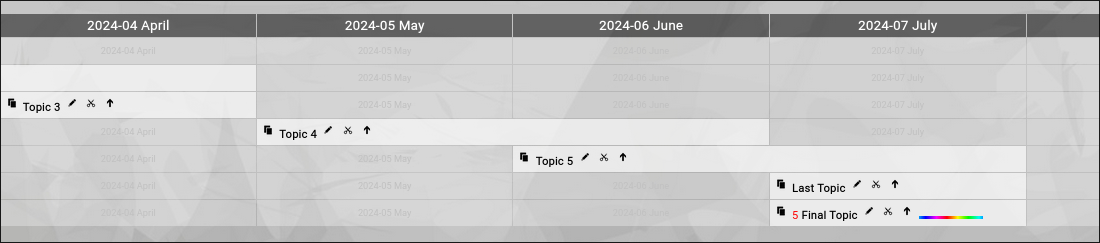
You can now influence this by for example setting the "Sort” of the "Fifth Topic” to 5 (any number larger than the default of 0).
And now we add some example "States” and "Percentages” to the five topics:
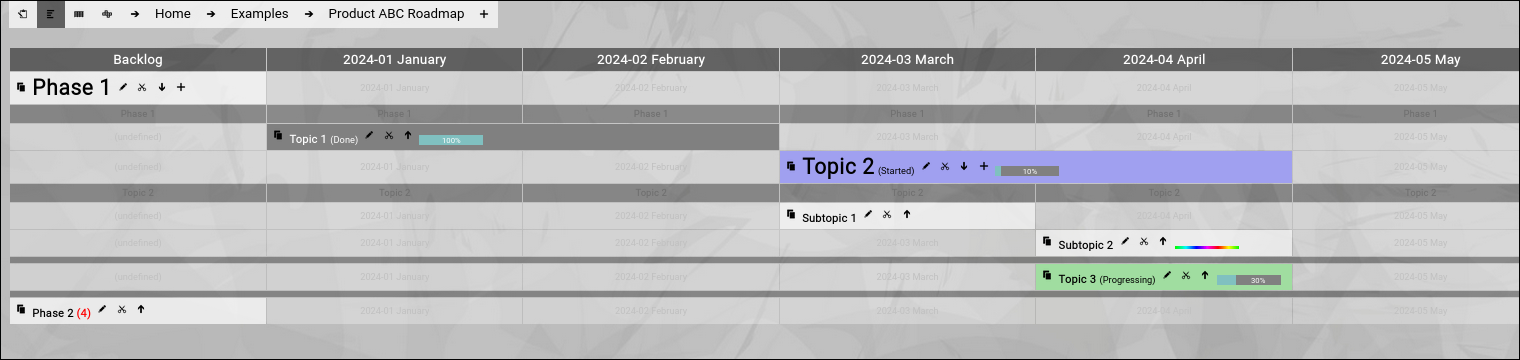
You see, that you can use everything you have learned with the other view modes, also in the Roadmap view mode. You can even apply the logic of "open” and "close” of a topic.
You can now dynamically open and close the two phases (or, if you prefer, drill into them):
Again, this gives your roadmap more structure and the ability to focus on the different phases. And last but not least, there is the capability to use any of the topics on the roadmap as a kind of "sub roadmap”.
"Open” and "close” automatically use the same rendering timeline as the currently focused "Product ABC Roadmap” topic. If you do not intend to open+close the topic but drill-into the topic instead, it is even possible to use a different timeline (of the same or of different granularity) for the "sub roadmap”. For that you simply set a different "Subtopics Timeline” for the topic which functions as a "sub roadmap”. This allows you for example to set a "Subtopics Timeline” timing of "Calendar Week 30” with a span of "8 units”. As soon as you drill into our "Topic 2” (with the modifications above), you will see something like this:
Mixing GranularitiesThere is one caveat with this approach. If you have already set a timing for the two topics below the "Topic 2” (for example "March 2024”), you will no longer see these topics when you switch the "Subtopics Timeline” timing to calendar weeks. This is because the roadmap view mode will only show the topics which fit the range of the specified "Subtopics Timeline”. To correct this, you can temporarily switch to the Contextchart view mode and edit each topic to adjust their timeline either to "(undefined)” or to a proper setting in range. Or you can use is intentionally, as you want to see two topics on the overall roadmap and when you drill down, you want to see a more detailed breakdown into calendar weeks. SummaryTo sum it up, the Roadmap view mode is capable of rendering even complex multilevel roadmaps, while still providing all the basic features of the other view modes. You can even jump in granularity during drill down, but this is indeed an advanced approach. We want to mention one final (probably interesting) capability here: You can even mix the timing granularity of different topics below one single topic. You may start with a monthly granularity (and set this as the default "Subtopic Timeline” in the topic which represents the roadmap or the sub roadmap. Then you start using the Filter bar (which will be explained later) to override to calendar week granularity and add additional topics with the calendar week granularity. Clearing the filter will switch back to the default monthly view; setting a manual filter again will make the calendar week topics appear again. And now it is time for you to dive into planning and using roadmaps yourself. Have fun. |