Editing a Topic
Let us have a look again at the topic editor screen and explain all the available fields in detail.
Remember that this screen is invoked by clicking the "Edit” button next to a topic or when adding a new topic:
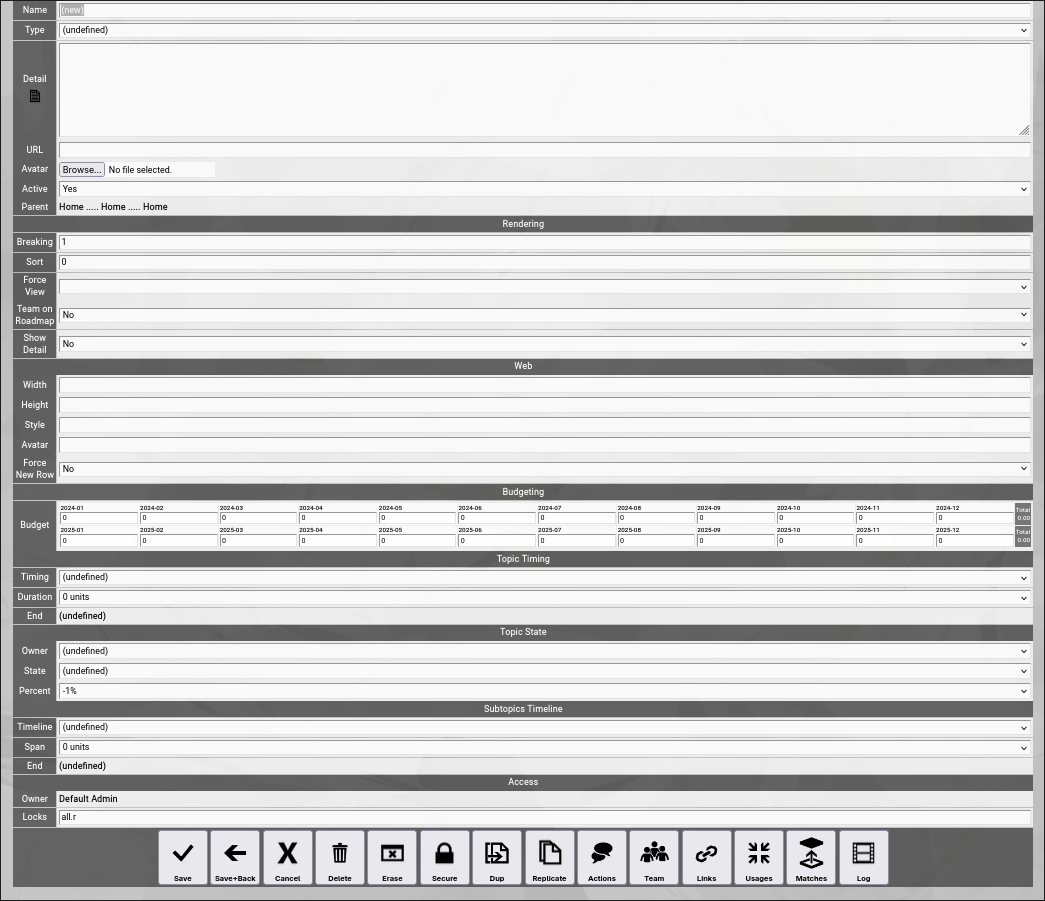
(Zingoolarity topic editor screen)
Let us explain all the available fields:
GENERAL fields
General fields deal with the general attributes of a topic and are always useful in some way.
- Name
The "Name” of a topic represents its easy-to-understand name.
It is always shown in the different views in Zingoolarity.
- Type
The optional "Type” of a topic can further specify of which kind the topic is.
If you select a type, the view of a topic will change to the following (You will notice the type on top):

(One Zingoolarity topic on the map with the type set to "Company”)
- Detail
The optional "Detail” of a topic is a full text description, optionally formatted in HTML.
This allows you to store formatted text inside of the topic.
If you use HTML sparsely and feel up to it, you can enter HTML tags directly (e.g. if you want to underline something in the text, you can include it in tags).
If you want to do more sophisticated stuff, you can activate the embedded HTML WYSIWYG editor by setting the option "Use HTML Editor” in the "Settings” screen (upper-right corner of the screen) to "On”.
If you want to have more screen space before editing your topic, you can click on the "Detail” label (this makes only sense if you are not using the HTML editor, because the HTML editor has its own "full screen” option available).
- Keyword
The optional "Keyword" is a short phrase, which represents a secondary key for pages in websites.
It is used internally by the help subsystem of Zingoolarity.
- URL
The optional "URL” of a topic allows you to enter or paste a link to an external application or document.
When you focus on the topic, the URL will be shown below the "Detail” in a separate box.
- Avatar
The optional "Avatar” allows you to upload a binary attachment to the topic.
You have to click on the "Browse” button to select a file from a local directory.
If you upload a file ending with either ".jpg”, ".png” or ".gif”, it will be identified as a picture and also rendered as a topic icon in the different views.
If not (if it is for example a document for an application), it can be downloaded for viewing or editing.
- Active
By default, a new topic is active.
If you set a topic to inactive, it will be rendered in "stroke out” format in the different views.
Setting a topic to inactive can be used as some kind of "soft delete”.
- Parent
This field is not directly editable and shows up to 3 levels of topics above the currently edited topic.
To move a topic to another parent, you can either use the cut&paste approach explained further down in this getting started guide or you can click on the "Parent” label to view and navigate the breadcrumb above the currently edited topic and click on the "Target” button next to a topic to assign it as the new parent (clicking the "Cancel” button will return to the "Edit” screen without any changes).
RENDERING fields
Rendering fields influence the rendering of the topic in the different views.
- Breaking
The "Breaking” of a topic allows you to specify the number of columns after which a new row will be started, when topics inside of this topic are rendered.
The default is 1 (which means that topics inside of this topic will be aligned vertically).
We have used this field already in the "Configuring the Home Topic” chapter.
- Sort
The "Sort” of a topic specifies an optional additional numeric sort criteria for this topic.
The default is 0.
If you specify for example 1, this topic will be sorted after all other topics which still have 0.
This allows you to influence the sort order and force topics either to the beginning or the end of a list.
- Force View
The "Force View” of a topic optionally switches to a specified view if the topic is focused.
Under normal conditions, the different view modes can be toggled by clicking the different view buttons in the breadcrumb.
But if you want to explicitly build a roadmap (assembling the topics below on a timeline), you can force for example the "Roadmap” view on the topic which represents the roadmap.
- Team on Roadmap
The "Team on Roadmap” of a topic specifies whether a team which you have added to the topic will be rendered in the different views or not.
If for example you want to create an organizational chart, you set this to "Yes” in each topic representing an organisational unit, a department or a team.
For more information on "Teams” see further down in this getting started guide.
- Show Detail
The "Show Detail” of a topic specifies whether the "Detail” of a topic will be rendered in the different views or not.
By default the "Detail” of a topic are only rendered, when the topic is focused.
WEB
Web fields are only used by the already mentioned 4th view in Zingoolarity: the "Web”.
- Width
The optional "Width” of a topic defines a value of pixels (e.g. "128px”) or a value in percent (e.g. "30%”) to optionally specify the width of a topic when rendered as web content.
The default width is "15%”.
- Height
The optional "Height” of a topic defines a value of pixels (e.g. "256px”) to optionally specify the height of a topic when rendered as web content.
The default height is "128px”.
- Style
The optional "Style” of a topic allows you to directly enter style attributes for the topic when rendered as web content.
If you for example enter "background-color:#ff8080;color:#ffffff;” here, the topic will be rendered with a white font on a red background.
- Avatar
The alternative "Avatar" of a topic allows you to enter an image URL which will be rendered in the web view.
This is similar to the behavior of an avatar attachment, but it is "by reference" without uploading any data.
When designing micro websites in Zingoolarity, this is helpful if you deal with large binary data (e.g. movies), which you do not want to include in the database.
- Force New Row
The optional "Force New Row” of a topic defines whether a new row will begin after this topic when rendered as web content.
BUDGETING
Budgeting fields can be used to add an optional financial budget to a topic.
- Budget
The "Budget” of a topic consists of a predefined arrangement of fields depending on the "Periods” available in your Zingoolarity instance.
The most common setup will show the 12 months of the current year in the first row and the 12 months of the next year in the second row.
But this can be configured to a completely differently setup by editing the "Periods” in your instance.
By default, the budget is 0 for each and every months (which means "non-existent”).
As soon as you enter an amount in at least one month, the topic will have an active budget and all the periods and their amounts will be rendered in the different views inside of the topic.
The views will automatically aggregate totals, if appropriate for the view mode.
Other topics can now become "Invoices” (representing spent amounts of money), which can be matched to the topics with a budget.
Matching is explained further down in this getting started guide.
TOPIC TIMING
Topic timing fields optionally specify a timing for the topic.
- Timing
The "Timing” of a topic is selectable from the predefined timings available in your Zingoolarity instance.
A timing in the context of a roadmap is not a fixed date, but a slot on the timeline of variable length.
This is usually either a month inside of a year (for monthly granularity) or a calendar week inside of a year (for weekly granularity).
But you can add for example your own sprint cycles with 2 weeks each, if your setup requires this.
As an example, you would assign a topic to "2024-08 August”.
- Duration
The "Duration” of a topic specifies, how many cycles of the selected timing are used.
If we stick to the example of the "2024-08 August” timing above, you could for example select "2 units” to signal that your topic will be executed in August and September.
If you select a timing and do not select a duration, Zingoolarity assumes "1 unit”.
- End
The "End” of a topic is a calculated valued based on the previously entered timing and the previously entered duration.
In the above example of the timing of "2024-08 August” and the duration of "2 units”, the calculated end would be "2024-09 September”.
TOPIC STATE
Topic state fields optionally specify information about who is responsible for a topic and in which execution state the topic currently is.
- Owner
The optional "Owner” of a topic specifies the user who owns the topic and is responsible for it.
- State
The optional "State” of a topic specifies the state in which the topic currently is.
States are predefined for your Zingoolarity instance.
For more details about the default states, see "Using the States Browser” near the end of this getting started guide.
- Percent
The optional "Percent” of a topic specifies an estimate, to which degree a topic has already been completed.
The default is "-1%”, which means "not started”.
Any other value will make a percentage bar appear when rendering the topic in one of the available views.
As this is an estimate, percentages are available in steps of 10%.
Note that some states have percentages associated.
If you for example set the state to "Done”, the percentage will be automatically set to "100%”.
This behavior can be configured in the state browser.
SUBTOPICS TIMELINE
Subtopic timeline fields optionally specify the starting point and the number of available slots, if this topic is used as a roadmap itself.
Thereby it also specifies implicitly the granularity of the timeslots.
- Timeline
The "Timeline” of a topic is selectable from the predefined timings available in your Zingoolarity instance.
A timeline in the context of a roadmap is not a fixed date, but a slot of variable length.
This is usually either a month inside of a year (for monthly granularity) or a calendar week inside of a year (for weekly granularity).
But you can add for example your own sprint cycles with 2 weeks each, if your setup requires this.
As an example, you would assign a topic to "2024-08 August”.
- Span
The "Span” of a topic specifies, how many cycles of the selected timeline are used.
If we stick to the example of the "2024-08 August” timing above, you could for example select "2 units” to signal that your topic will span August and September as a roadmap.
If you select a timeline and do not select a duration, Zingoolarity assumes "1 unit”.
- End
Again, the "End” of a topic timeline is a calculated valued based on the previously entered timeline and the previously entered span.
In the above example of the timeline of "2024-08 August” and the span of "2 units”, the calculated end would be "2024-09 September”.
ACCESS
Access fields specify who can access the topic at which access level.
For more details about access security, see the chapter about "Securing a Topic” further down in this getting started guide.
- Owner
The access "Owner” of a topic is usually the person who created the topic.
By default, the access owner always has full access to the topic.
- Locks
The optional "Locks” of a topic specify, which keys grant which access level to the topic.
By default (if no locks are set), only access by the owner of the topic is possible. |